Brown Spots on Houseplant Leaves: How to Read the Cause Before You Treat
Brown spots on houseplant leaves are not one single problem. A dry tan patch, crispy brown tip, translucent mark, yellow halo, black spreading area, raised brown bump or silver pest scar can all point in different directions.
Brown is the final colour of damaged tissue. The useful clues are how the damage started, where it sits, how it feels, and whether it is still changing. Before treating anything, check texture, spread, position and recent context.
Old marks are usually dry, fixed and unchanged. Active damage spreads, softens, darkens, develops halos, appears on nearby leaves or keeps showing up on new growth. That old versus active split is the fastest way to avoid treating every brown spot as fungus.
The goal is not to make the brown part green again. Dead leaf tissue does not recover. The useful goal is to stop new damage from forming, protect healthy growth, and avoid making the plant weaker by cutting, spraying, repotting or fertilising too quickly.
A fixed dry patch should be treated differently from fresh damage that darkens, softens or spreads.
Fast Diagnosis Table for Brown Spots on Houseplant Leaves
💡 Tip: On mobile, swipe the table sideways to compare patterns, active clues and first steps.
Brown spot patterns on houseplants and what to check first
Brown spot pattern
Likely direction
Active clue
First check
What to do now
Dry tan patch on a sun-facing leaf
Sunburn or light damage
Usually fixed, dry and not spreading
Recent direct sun, hot glass or grow light distance
Reduce or filter light; keep the leaf if enough healthy tissue remains
Crispy brown tips
Salts, drought history, root stress or uneven watering
Fresh tips keep drying on new leaves
Fertiliser use, water quality, root moisture and substrate condition
Stabilise watering and review feeding before adding anything
Brown crispy edges
Dry stress, root stress, salts or heat load
Margins keep advancing or crisping on new growth
Pot moisture, roots, leaf exposure and recent heat
Fix water, roots or light exposure before cutting marked edges
Translucent or wet-looking spot
Oedema-like damage, cold injury or active tissue damage
More concerning if soft, darkening or spreading
Texture, underside, cold exposure and spread speed
Reduce wet conditions; isolate if new marks appear
Raised corky brown spots
Oedema-like water-balance damage
Usually fixed once corky and not infectious
Wet substrate, low light, low airflow and leaf underside
Improve drying rhythm, usable light and airflow
Raised brown bumps on stems, veins or undersides
Scale insects
Bumps sit on the surface, cluster or scrape off
Leaf ribs, petioles, stems, nodes and sticky residue
Isolate, remove visible pests and treat as an active pest issue
Brown or black spot with yellow halo
Active tissue reaction
Halo widens or similar spots appear nearby
Wet-looking edge, spread, leaf wetness and affected leaves
Isolate if active; remove badly affected leaves where safe
Angular brown mark
Damage limited by leaf veins
Spots sharpen, multiply or spread past veins
Leaf veins, wet conditions and nearby leaves
Treat cautiously if wet-looking, spreading or repeated
Silver patch turning brown with black dots
Thrips damage
New scars, black flecks or distorted new growth
New leaves, undersides, petioles and tight growth points
Isolate and treat for pests
Fine pale stippling becoming bronze or brown
Spider mites
Stippling spreads, webbing appears or leaves drop
Leaf undersides, petioles, webbing and moving specks
Isolate and treat pests early
Brown patches after spraying, wiping or treatment
Contact scorch or spray damage
Damage follows treated areas or appears after strong light
Leaf shine, oils, alcohol, soaps, sprays and timing
Stop the product, rinse if recent, keep out of harsh light and monitor
Brown crease, tear or bruise
Mechanical damage
Fixed location with no spread
Shipping, handling, folded leaves or rubbing
Leave it alone unless tissue becomes soft or active
Black soft spreading tissue
Rot, cold damage or serious active tissue collapse
Softness, smell, dark spread or stem involvement
Stem, petiole, crown, roots and substrate moisture
Isolate, stop wetting leaves and check roots
Should You Wait or Act Now?
The safest response depends on whether the mark is stable or still changing. A dry old scar does not need the same response as a soft black patch at the crown, a spreading yellow halo or new pest damage on fresh growth.
➜ Watch it first
Watch the mark first if it is dry, papery, fixed in size, limited to one older leaf, or clearly linked to old rubbing, folding, shipping pressure or a past sunburn event.
Keep care steady and check again after a few days. If no new spots appear and the edge does not move, the damage is probably old rather than active.
➜ Act sooner
Act sooner if the spot is wet-looking, soft, blackening, spreading, haloed, appearing on several leaves, paired with drooping in wet substrate, or found near the stem, crown, node or petiole base.
Separate the plant from others, stop wetting the leaves, inspect for pests, and check the root zone before adding more water or fertiliser.
How to Monitor Brown Spots Without Overreacting
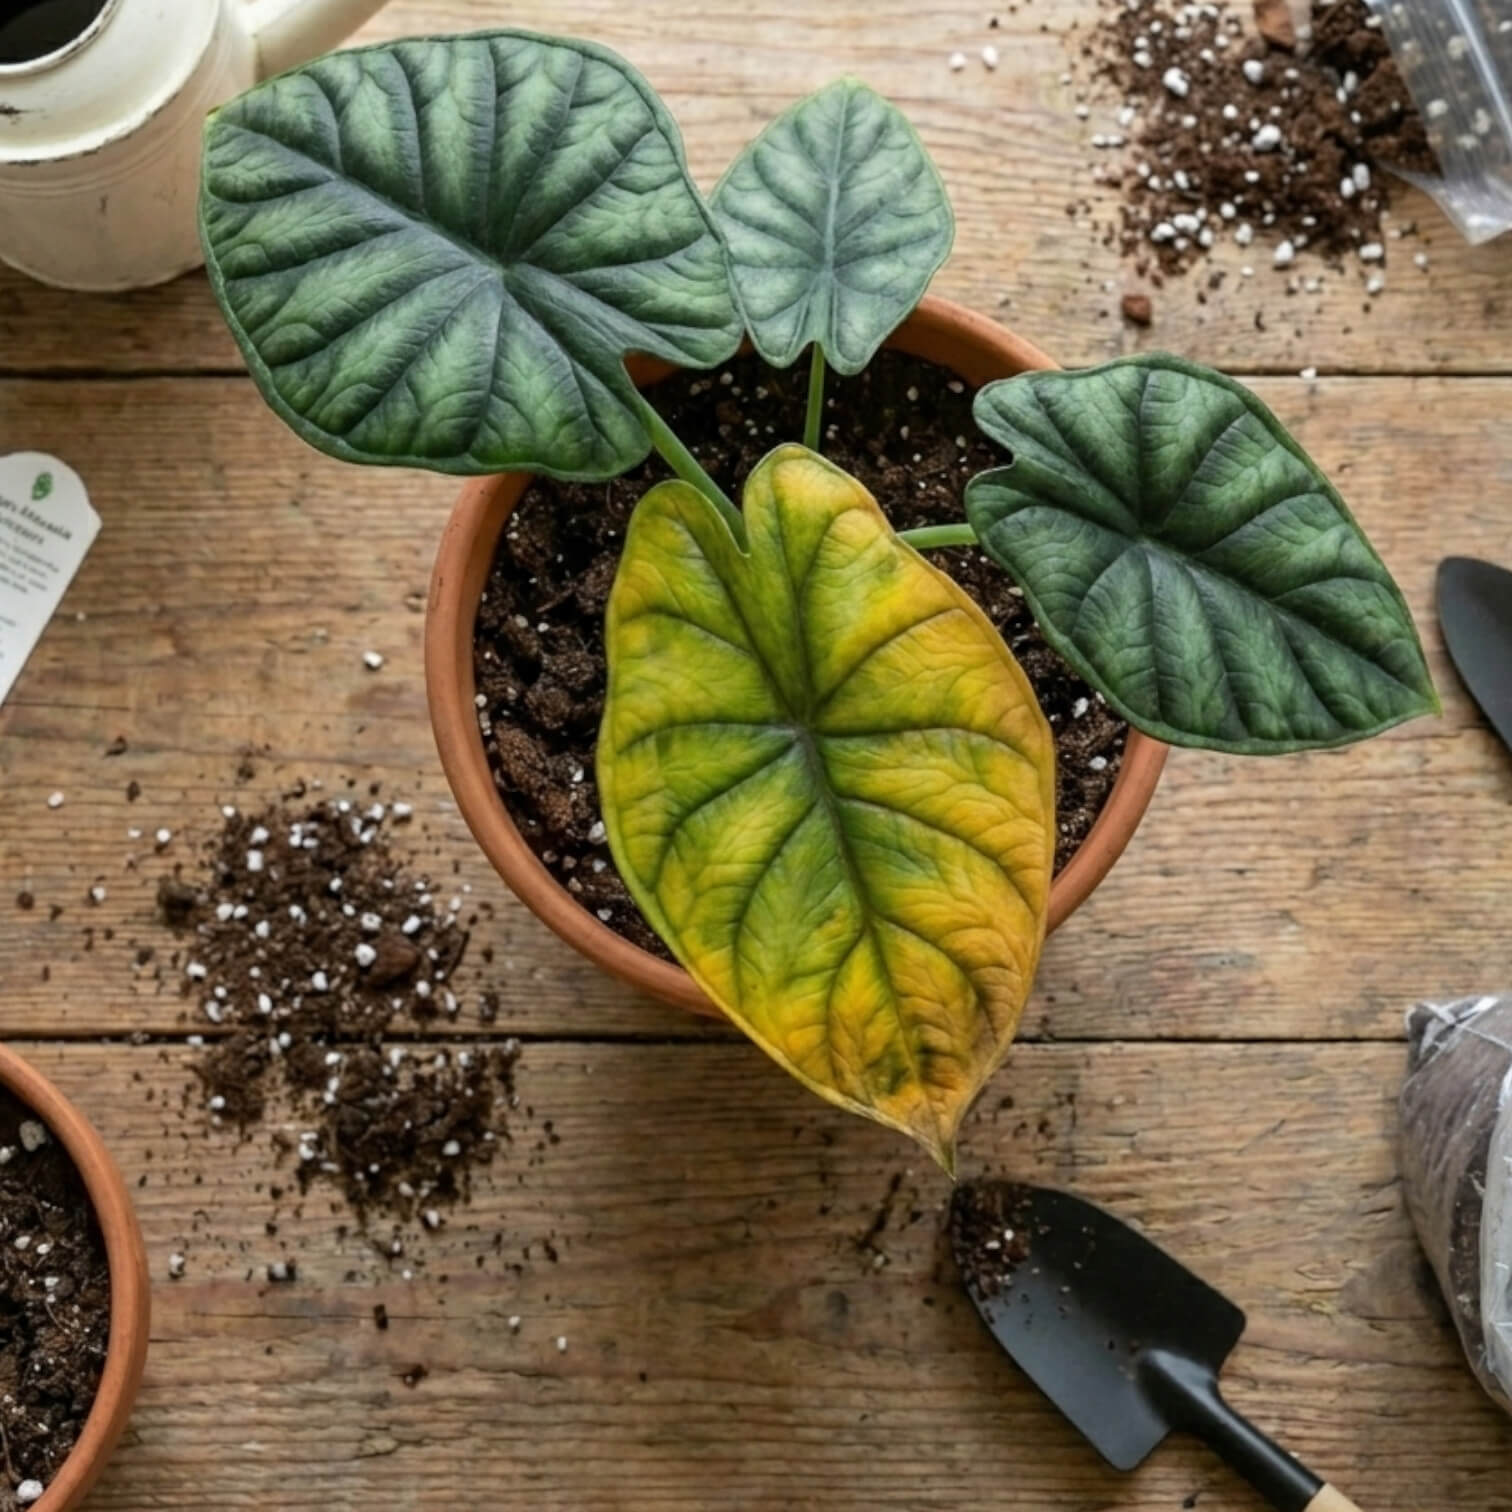
Blackened growth beside yellowing tissue is a warning sign to check stem, crown and root conditions first.
If a brown mark is dry and not spreading, monitor it before changing care. Take a clear photo in good light, check the same leaf again after a few days, and compare whether the edge has moved, darkened or softened.
Stable damage: Dry, fixed marks can usually stay unless they bother you visually.
Active damage: Spots that expand, soften, darken or appear on new leaves need closer inspection.
New symptoms: Fresh marks on new growth matter more than old scars on older leaves.
Repeated pattern: Similar marks on several leaves are more important than one isolated old spot.
Changed care: A recent move, repot, spray, fertiliser dose, cold night or watering mistake can explain a sudden mark without proving disease.
Judge progress by whether new damage stops forming. Old brown tissue will not turn green again, even after the original problem has been fixed.
First Check: Texture, Spread, Position and Context
Do not diagnose brown spots by colour alone. A dry scar, wet mark, pest scrape, salt-burned edge and old bruise can all turn brown after cells are damaged.
Texture: Is the mark dry, crispy, wet-looking, soft, corky, raised, silvered, stippled, torn or creased?
Spread: Is it fixed, enlarging, darkening, softening or appearing on more leaves?
Position: Is it on tips, edges, new growth, undersides, petioles, stems, crown or the sun-facing side?
Context: Did light, watering, fertilising, shipping, repotting, temperature, treatment sprays or pest pressure change recently?
Fixed dry damage is usually old damage. Advancing damage spreads, softens, develops halos, appears on nearby leaves or keeps showing up on new growth. That difference matters more than the exact shade of brown.
Also check whether the marked leaf is an old outer leaf or a new expanding one. Older leaves often show past stress first. New leaves can reveal current problems more clearly because pests, root issues, light damage and nutrient salt stress often show up while tissue is still soft or developing.
Dry Tan Patches: Sunburn and Light Damage
Dry tan patches after a light change point to exposure, lamp distance and heat before fertiliser or sprays.
Dry tan, beige or pale brown patches often point toward light or heat injury, especially when they appear on the side of the plant facing a window or grow light. Indoor leaves that formed in softer light can be damaged when they are suddenly moved into strong direct sun or placed close to hot glass.
Grow lights can also cause brown patches when the lamp is too close, runs too long, or creates more intensity and heat than the plant can handle. Damage is usually dry, pale and papery. It may look bleached before it turns tan or brown.
Sunburn damage does not turn green again. A marked leaf may still help the plant if enough healthy tissue remains, so cutting is optional unless damaged tissue is ugly, soft or spreading. Reduce direct exposure, increase distance from grow lights, filter harsh sun or move the plant away from hot glass.
Light damage can also combine with other stress. A recently shipped, repotted, dehydrated or pest-weakened plant may mark faster under the same window or lamp than a settled plant with healthy roots. Check the recent care history before blaming only the window.
Crispy tips are better diagnosed from watering rhythm, salts, roots and heat load than from humidity alone.
Crispy brown tips and margins are often blamed on low humidity, but that is too narrow. Leaf tips and edges are vulnerable points, so they can show stress from several root-zone and water-balance problems.
Common triggers include dry root balls, uneven watering, old compacted substrate, mineral build-up, repeated fertilising when growth is slow, root damage, heat load and sensitive thin leaves. If only the oldest tips are lightly marked and the plant is otherwise growing well, damage may be minor. If new leaves keep developing brown tips, the care rhythm needs checking.
Crispy edges can also appear after a past drought even if the plant is now wet. Roots damaged by drying out can struggle once watered again, and a waterlogged pot can create a similar above-ground look because roots cannot function properly in low-oxygen conditions. That is why pot moisture, root condition and substrate structure matter more than the brown edge itself.
Translucent or wet-looking patches need a closer look at texture, speed of change and nearby growth.
Translucent, greasy-looking or wet-looking brown spots need more caution than dry old scars. This type of damage can come from several different problems, so check spread, softness and recent conditions before choosing treatment.
If the spot later becomes raised or corky and does not spread, it may be oedema-like water-balance damage. If it appeared after cold exposure, it may be chilling injury. If it enlarges, develops a yellow halo, appears on nearby leaves or has a wet-looking margin, treat it as active damage until conditions are clearer.
Soft wet damage near stems, petioles, nodes or the crown is more serious than one fixed mark in the middle of a leaf. Isolate the plant if fresh spots keep appearing, avoid wetting leaves, and check whether the substrate is staying wet for too long.
Do not keep watering because the leaves look weak. A plant with damaged, cold-stressed or oxygen-starved roots can wilt even when the pot is wet. In that situation, extra water usually makes the root zone worse.
Corky Brown Spots and Oedema-Like Marks
Corky or blistered marks usually need steadier water balance, usable light and airflow, not a spray.
Raised corky brown spots are often mistaken for pests or disease. On some houseplants, especially firm-leaved plants, oedema-like marks can develop when water uptake and transpiration fall out of balance. Tissue may start slightly swollen, translucent or blistered, then dry into rough corky marks.
This is usually not infectious when marks are fixed, corky and not spreading between leaves. It is a physiological damage pattern, not something that can be sprayed away.
Check growing conditions around the plant. Oedema-like marks are more likely when the substrate stays wet while light, warmth and airflow are too low for the plant to use that water efficiently. Adjust watering rhythm, improve drainage if needed, increase usable light gradually and avoid keeping the root zone constantly wet.
Firm-leaved plants can carry corky marks for a long time. The old spots do not need to disappear for the plant to be stable. The useful sign is that new leaves develop cleanly and no fresh raised patches appear.
🔗 If slow-drying substrate is part of the pattern, our root aeration guide and substrate articles are better starting points than a spray treatment.
Raised Brown Bumps: Scale Insects or Corky Leaf Marks?
Raised brown bumps should be checked for surface attachment before they are treated as corky leaf scars.
Raised brown spots are not always part of the leaf. Scale insects can look like small brown, tan or shell-like bumps on stems, petioles, leaf ribs and undersides. They are easy to miss because they often sit still and blend into older plant tissue.
The key difference is placement and attachment. Corky oedema-like marks are formed within damaged leaf tissue. Scale insects sit on the surface. Some can be lifted or scraped away, and they often appear in clusters around veins, petiole joints, nodes or sheltered stem sections.
Check for sticky residue, shiny patches below the plant, repeated bumps in protected areas, yellowing near feeding sites or weak new growth. If scale is present, isolate the plant, remove visible insects carefully and treat it as an active pest problem. Do not confuse scale with one or two fixed corky scars that are embedded in the leaf and not spreading.
💡 Look beyond the leaf blade. Scale often hides where stems branch, where petioles meet stems, along midribs and under older leaves. A quick top-down look can miss the problem.
Brown Spots After Sprays, Oils or Leaf Wipes
Brown patches can appear after leaf shine, oil sprays, soap sprays, alcohol wipes, repeated pesticide use or cleaning residues. Damage is more likely when treated leaves are placed in strong light soon afterwards, when products are applied too heavily, or when sensitive leaves are rubbed while soft or thin.
Contact scorch often follows treated areas rather than appearing randomly across the plant. Leaves may show dull patches, brown speckles, papery marks, edge burn or irregular staining where liquid pooled.
Stop using the product and keep the plant out of harsh direct light while you monitor it. If treatment was very recent and residue is still visible, gently rinse leaves with plain water and let them dry with good airflow. Do not layer another spray on top of the first problem. For future treatments, test one small area first and avoid treating stressed, wilted or freshly shipped plants unless pests make treatment necessary.
Spray damage can look dramatic but may stop quickly once the residue is removed and the plant is kept stable. Judge recovery by clean new growth and lack of fresh marking, not by whether old treated leaves look perfect again.
Brown Spots with Yellow Halos
Yellow halos show a tissue reaction; spread and fresh spotting decide how urgently the plant should be isolated.
A yellow halo is a warning sign, not a diagnosis. It does not prove fungus, bacteria or any one disease. It does mean surrounding tissue is reacting, so spread matters more than the halo alone.
Look for active behaviour. Are spots enlarging? Are new spots appearing on nearby leaves? Do edges look wet, dark or soft? Are several leaves affected at once? If yes, isolate the plant while you inspect more closely.
Fuzzy growth, powdery growth, visible spores or repeated spotting under persistently wet, still conditions make a disease issue more likely, but visual symptoms alone usually cannot confirm the exact disease.
Remove badly affected leaves if the damage is spreading and the plant has enough healthy tissue left. Use clean tools, avoid wetting spotted leaves and give the plant more space so leaves can dry properly. Do not fertilise as a panic response. Fertiliser does not repair damaged tissue and can make salt-related edge burn worse.
What Angular Brown Spots Can Mean
Angular brown spots are marks with edges that look blocked or squared off by leaf veins. This pattern can appear when damaged tissue is limited by vein structure, which is why angular spots deserve more caution when they are spreading, wet-looking or appearing on several leaves.
Angular shape alone is not enough for a diagnosis. A fixed old angular mark can be cosmetic. An angular, wet-looking, spreading mark should be treated more cautiously: isolate the plant, avoid leaf wetness and monitor nearby leaves closely.
Black Spreading Leaf Damage
Dark soft damage near petioles, crowns or roots needs a cautious stem and root check before more watering.
Black, soft or spreading tissue deserves faster action than a dry brown scar. This is especially true when dark damage is near a petiole, stem, crown, node or root zone.
Possible causes include cold damage, rot-related tissue collapse or infection-like damage. The exact cause cannot be confirmed by appearance alone, but the response should be cautious: isolate the plant, stop wetting leaves, avoid fertiliser and check whether the substrate is too wet or poorly aerated.
If damaged tissue is soft, smells bad, spreads quickly or reaches stems and roots, remove affected tissue where possible and inspect the root zone. Do not keep watering just because leaves look stressed. Wet roots can still fail to move water properly when oxygen is low or tissue is damaged.
Black damage on a leaf edge is less urgent than black soft tissue moving into the petiole, stem, crown or rhizome. The closer the damage is to the plant’s growing point or storage structure, the faster it should be checked.
Silver, Bronze or Stippled Damage from Pests
Pest damage often starts as silvering or stippling before injured tissue dries brown.
Pest damage is often misread as fungal spotting because feeding marks can dry brown after tissue is injured. Look for pattern and placement, especially on new growth and undersides.
➜ Thrips damage
Thrips often leave silvery, scraped-looking patches that later turn tan or brown. Small black flecks may sit inside or near damaged areas. New leaves can emerge distorted, scarred or marked because thrips feed on soft developing tissue.
Check unfurling leaves, leaf undersides, petioles and tight growth points. If new scars keep appearing, isolate the plant and treat for pests. Old scars will remain even after pest pressure is controlled, so judge progress by whether fresh damage stops.
Use our thrips on houseplants guide when you see silvering, black flecks, distorted new growth or active insects.
➜ Spider mite damage
Spider mite damage usually starts as fine pale stippling. Leaves may then take on a dull yellow, bronze or dusty look before sections turn brown. Webbing can appear later, especially along undersides, petioles and tight leaf angles.
Use bright light and inspect undersides closely. Moving specks, fine webbing and repeated stippling are stronger clues than one isolated brown spot. Treat early because heavy mite pressure can lead to browning, leaf drop and slow recovery.
Scale insects may look like brown spots before they look like pests. They often sit along stems, petioles, nodes and leaf veins rather than scattered randomly across the flat leaf surface.
Sticky residue, shiny patches below the plant and repeated bumps in sheltered places are stronger clues than colour alone. Treat scale as an active pest issue when bumps can be lifted, clustered or found on multiple parts of the plant.
Brown Marks After Shipping
Shipping can leave brown marks without meaning the plant is failing. Leaves can fold, rub, bruise or press against packaging. A mark may only become obvious after the plant has been unpacked and rehydrated.
Fixed creases, dry bruises and single damaged older leaves are usually cosmetic. Monitor the plant, keep care stable and avoid cutting everything at once. A leaf with a dry mark can still support the plant if enough healthy tissue remains.
More caution is needed when damage is soft, black, wet-looking, spreading or appearing on several new leaves after arrival. Photograph the plant in good light, keep affected plants separate from others and check roots, stems and new growth before making care changes.
After shipping, avoid combining several stress responses at once. Do not repot, fertilise, spray, prune heavily and move the plant into stronger light on the same day. Stable warmth, careful watering and a short observation period are often safer for a plant that only has fixed dry marks.
Brown spots after repotting often come from root disturbance and a changed moisture rhythm. New substrate may hold water differently, dry from the outside while staying wet inside, or leave air pockets around roots if it was not settled properly.
Old leaves may react first while roots re-establish contact with the substrate. This does not automatically mean the plant needs another repot. Repeated repotting can make root stress worse unless rot, severe compaction or a serious substrate problem is present.
After repotting, keep conditions steady. Avoid fertilising immediately, avoid strong sudden light changes and check moisture deeper in the pot rather than watering by habit. If brown spots spread, look wet or appear together with drooping in wet substrate, inspect root health.
Also check whether the new pot is much larger than the old one. Extra substrate around a small root system can stay wet for longer, especially in low light or cool rooms. That can create root stress even when the watering amount seems normal.
It depends on the damage type, the plant’s strength and how much healthy leaf area remains.
Dry old marks: A single dry old mark can stay on the plant. Cutting is optional and mostly cosmetic. Sunburn damage will not turn green again, but remaining healthy leaf area may still photosynthesise.
Pest scars: Pest damage also remains visible after treatment. Treat pests first, then decide later whether scarred leaves are worth keeping. Removing every marked leaf before pest pressure is controlled can weaken the plant.
Wet or spreading tissue: Spreading wet, black or infection-like damage is different. If a leaf is badly affected and the plant has enough healthy tissue left, removing it can reduce active damaged tissue and make monitoring easier.
Many marked leaves: Do not strip the plant bare. A stressed plant still needs working leaves. Remove the worst active damage first, then stabilise the cause.
Cosmetic trimming: Brown tips can be trimmed with clean scissors if the plant is stable. Leave a tiny dry edge rather than cutting into healthy green tissue.
💡 If the cause is still active, cutting alone will not solve the problem. New damage will continue until the underlying issue is corrected.
❌ What Not to Do When Brown Spots Appear
Do not treat every brown spot as fungus.
Do not mist spotted leaves.
Do not fertilise a stressed plant to “repair” brown tissue.
Do not cut every marked leaf at once.
Do not keep watering if the substrate is already wet.
Do not ignore pests just because marks look dry.
Do not layer oils, soaps or sprays onto leaves without checking the cause.
Do not expect damaged tissue to turn green again.
Do not repot immediately unless root health or substrate condition gives a real reason.
Plant-Specific Brown Spot Notes
Plant-specific leaf texture and growth habit help separate cosmetic old marks from active damage.
Anthurium
Anthurium leaves are thick and can hold old scars for a long time. Dry edge damage often points toward roots, salts, watering rhythm or substrate conditions before simple humidity. Spreading halos, soft edges or new spots need isolation and closer inspection.
Alocasia
Alocasia can mark after light stress, cold exposure, shipping stress or root instability. Dry old patches are less concerning than wet black tissue on petioles, crown or new growth. If the substrate is wet and leaves are declining, check roots before watering again.
Philodendron and Monstera
Philodendron and Monstera leaves often show mechanical tears, creases and brown edges where tissue was folded or rubbed. Fixed dry damage is usually cosmetic. Spreading haloed spots or pest scarring on new growth need a different response.
Hoya
Hoya leaves can show old scars, corky marks or oedema-like spots on firm tissue. Fixed corky damage is usually less urgent than soft black tissue near stems, nodes or new growth. Wet substrate plus soft tissue deserves a root and stem check.
Prayer Plants
Prayer plants can develop crispy tips and margins when moisture rhythm, salts, roots, water quality or heat and light stress are off. Do not reduce every brown edge to humidity. Check substrate moisture, fertiliser strength and root condition first.
Ficus
Ficus may mark or drop leaves after movement, cold exposure, light change or watering shifts. Dry old marks can be cosmetic, but leaf drop combined with wet substrate should push the diagnosis toward root-zone stress.
Succulents
Succulents can carry dry scars from old physical damage. Translucent, soft brown or black tissue is different and more urgent, especially when the substrate is wet. Check roots and stems quickly if soft tissue spreads.
FAQs About Brown Spots on Houseplant Leaves
Why does my houseplant have brown spots on leaves?
Brown spots appear when leaf tissue has been damaged. The cause may be sunburn, dry stress, salt build-up, root stress, cold injury, pests, active lesions, oedema-like damage, spray scorch or old mechanical bruising. The useful clues are texture, spread, position and recent changes.
Are brown spots on houseplants always fungus?
No. Many brown spots are not fungal. Dry scorch, pest scars, old bruises, salt-related tip burn, cold damage, spray scorch and oedema-like marks can all turn brown. Fungal or bacterial-looking problems are more likely when spots spread, develop wet-looking edges, show halos, produce visible fungal growth or appear on several leaves.
What do brown spots with yellow halos mean?
A yellow halo means nearby tissue is reacting. It can be a disease warning sign, but it is not a confirmed diagnosis by itself. Check whether spots are spreading, wet-edged, soft or appearing on more leaves. If they are active, isolate the plant and remove badly affected leaves where safe.
Should I cut off leaves with brown spots?
Cutting depends on the damage type. One dry old mark can stay. Sunburn and pest scars will not turn green again, but the leaf may still help the plant. Remove leaves with spreading wet, black or infection-like damage if the plant has enough healthy tissue left.
Can sunburn cause brown spots on indoor plants?
Yes. Sudden direct sun, hot window glass or a grow light placed too close can cause pale tan or brown papery patches. Damage usually appears on exposed leaves and does not heal green again. Adjust the light rather than fertilising or misting.
Why are leaf tips turning brown?
Brown tips can come from uneven watering, dry root balls, root stress, salt or fertiliser build-up, heat load or sensitive leaves. Low humidity may contribute for some thin-leaved tropical plants, but it should not be the first assumption without checking roots, substrate and watering rhythm.
Can pests cause brown spots?
Yes. Thrips can leave silvery scars that later turn brown, often with small black flecks and distorted new growth. Spider mites usually cause fine pale stippling first, then yellowing, bronzing, browning and webbing as pressure increases. Scale insects can look like raised brown bumps on stems, petioles and leaf undersides.
Can leaf sprays cause brown spots?
Yes. Oils, soaps, alcohol wipes, leaf shine, cleaning residues and pesticide sprays can mark leaves, especially if applied too heavily or followed by strong light. Stop using the product, rinse fresh residue if needed and monitor whether new damage stops.
Why are brown spots spreading?
Spreading means the damage is active. Possible causes include pests, active tissue damage, wet tissue collapse, cold injury, root stress or rot-related problems. Isolate the plant, stop wetting leaves and inspect new growth, undersides, stems and roots.
Why did brown spots appear after shipping?
Shipping can cause bruises, creases, folded leaves, cold or heat stress and old damage becoming more visible after unpacking. Fixed dry marks are usually cosmetic. Soft, black, wet-looking or spreading damage needs closer inspection.
Why did brown spots appear after repotting?
Repotting changes the root environment. Root disturbance, air pockets, different substrate moisture and a sudden care shift can all cause stress marks. Keep care stable, avoid fertilising immediately and do not repot again unless root problems or serious substrate issues are present.
Do brown spots disappear once the plant is healthy again?
No. Brown tissue is dead tissue, so old marks stay visible. A plant can still recover well if new growth is clean, roots are healthy and fresh damage stops appearing.
Sources and Further Reading
Further reading on plant symptom diagnosis, salinity injury, oedema and intumescence, pest feeding damage, scale insects, spray-related phytotoxicity and chilling injury:
Houseplant leaves turn yellow when chlorophyll breaks down or leaf tissue declines. The cause depends on the pattern: one old lower leaf can be normal ageing, several yellow leaves with wet substra...
I received perfectly heathy and absolutely beautiful plants, even bigger than expected. The delivery within Europe was really fast. I think Foliage Factory has one of the best plant web shops in the internet. It‘s just great to get so much informations about the plants. I will definitely order again :)
Walkerova
★★★★★
Die Pflanzen waren prima verpackt und ein heatpack war im Paket enthalten. Die Lieferzeit hat 2 bis 3 Tagen gedauert, was aus meiner Sicht wirklich gut ist. Alle drei Pflanzen haben die Lieferung gut überstanden. Ich habe mich auf Hoyas spezialisiert und habe schon die nächsten Pflanzen meiner Wunschliste auf der Website gefunden. Daher wird die nächste Bestellung nicht lange auf sich warten lassen.
Marion
★★★★★
Envoie très rapide (2 jours), plantes parfaitement emballées et super offres ! Je suis une habituelle j'ai passé 6 ou 7 commandes et je n'en peut être plus satisfaite du service client et de la qualité et variété des plantes offertes
Iris
★★★★☆
Die Sendung kam leider in keinem guten Zustand bei mir an, kann passieren. Habe mich darauf hin sofort an Foliage Factory gewandt und habe selten einen so guten, schnellen, freundlichen und kulanten Kundendienst erlebt.
Frauke
★★★★★
The plants have arrived in perfect condition, the roots and the foliage so so healthy! I had problem with 1 plant out of 16 and they have responded to my email almost instantly and the issue was resolved straight away. I'm really impressed and satisfied, definitely getting more plants from them again!
Patricija
★★★★☆
Very healthy and well packed plant. Unfortunately there was one plant that ordered couldn’t be delivered as it was out of stock hence 1 star less.
Sam
★★★★★
Everything arrived in good condition and very well packed - it wasn't easy with a fragile plant and a heavy bag of substrate. I recommend it!
Lia
★★★★★
Bester online-Pflanzenhandel den ich kenne (habe davor 4 andere ausprobiert). Eine teure Pflanze wurde beim Transport beschädigt und mir ersetzt. Der Kontakt dabei war auch sehr nett (danke Jan) und hat mir gut geholfen. Die anderen Pflanzen sind in einem sehr guten Zustand, keine Schädlinge, super Bewurzelung. Nur zu empfehlen! :)
C L
★★★★★
Super Service, Gute Auswahl, Preise sind fair. Eine Pflanze kam kaputt an, hab sofort Ersatz bekommen. Danke an den unkomplizierten (und blitzschnellen) Kundenservice!!
Sarah
★★★★★
The plants are carefully packaged and arrive in great conditions (I’m based in Spain) and they’re always there to help in any way they can with your purchase.I have and will always recommend Foliage Factory to every friend I can. I’m not only satisfied with their plants and prices, but their customer service is exceptional.





Leave a comment
This site is protected by hCaptcha and the hCaptcha Privacy Policy and Terms of Service apply.