

Mealybugs on Houseplants: How to Recognise and Treat Them
A white tuft at a leaf joint may be your first sign of mealybugs. You might also notice a sticky leaf beneath a colony, or a woolly insect that appears after you have cleaned the plant. Look closely at the material and the plant around it: other insects, fungi, mineral deposits and natural plant features can also look white. [1, 2, 3]
This guide helps you work out whether you are dealing with mealybugs, choose a response that suits your plant and judge what to do after treatment. Understanding where the insects hide, how they feed and how their young develop makes those choices easier.
Begin with recognition if you are unsure what you have found, or take the first steps for a mealybug you recognise. White material around roots and insects or deposits after treatment have their own explanations. Before using beneficial insects, check previous treatments; if a kit is already with you, see what to do before release.
How to recognise mealybugs
Mealybugs belong to the scale insects. Adult females commonly found on houseplants are small and soft-bodied, often oval and flattened, with a white, powdery or cottony wax covering. In familiar greenhouse species, the body can reach about 4 mm; projecting strands of wax can make the whole insect look larger. Their appearance varies with species and age. [1, 2, 4]
Look for the insect's body within the white material. A hand lens and good light can help you see its outline and legs. Fine strands of wax, called filaments, may fringe the body, with longer ones extending from the rear. A separate cottony mass beside or beneath the insect may be an egg sac, where wax surrounds a group of eggs. [1, 11, 12]

In most mealybug species, young insects and adult females have working legs, although they may stay in one place for long periods. You may see no movement during a brief check even when an insect is alive. Recognising a mealybug is usually enough to begin careful inspection and removal; identifying its exact species may need a specialist. [1, 18]
The youngest mealybugs can be easy to overlook. Newly hatched crawlers initially lack the familiar white wax and may look yellowish, orange or pink. They begin producing wax after settling to feed. During later checks, look for these tiny insects as well as cottony adults. [18]
Where to look on the plant
Begin at the leaf axils, the joints where leaves meet the stem. Check leaf undersides, overlapping leaf sheaths (the leaf bases that wrap around a stem), crevices between plant parts, and spaces between twining stems. On woody plants, insects may shelter beneath bark that is already loose. Look from several angles, moving leaves and stems only as far as they bend freely. Leave sound bark and tightly attached sheaths in place. [2, 3]
A plant can look clean from above while a colony sits beneath a leaf or behind a stem. Follow the stem around and check the hidden side too. Even after finding insects in one spot, inspect the rest of the plant. [2, 3]

Other causes of white or sticky material
Note where the material appears and look for an insect within it. White fluff, a powdery patch and a sticky surface can have different causes.
| What you find | Possible explanation | What to examine next |
|---|---|---|
| Cottony wax around a small insect | A mealybug or another wax-producing insect | Examine the body and filaments. For an identified mealybug, use the first response. If it is another insect or you remain unsure, get identification or pest-specific advice. [1, 2, 4] |
| A white egg mass beside or beneath a different-looking insect | Some other scale insects also produce cottony egg masses | Find the insect attached to or beside the mass. The egg covering alone may be misleading. [5] |
| A wax-covered colony on leaves or stems | Some aphids have a woolly appearance | Many familiar leaf-feeding aphids have a pair of small tubes towards the rear. Use several features together; root aphids need a separate check. [3, 47] |
| Powdery patches across a leaf | Powdery mildew is one possibility | Examine the pattern and surface growth, and look for an actual insect before choosing an insect treatment. [6] |
| Stickiness or black surface growth | Sugary deposits from mealybugs, other sap-feeding insects or plant secretions | Check the leaves, stems and flowers above the deposit, including any overhanging plant. The source may be elsewhere. [7] |
| A woolly insect after you have released beneficial insects | A predatory beetle larva may be present | Check the beneficial-insect description before removing or spraying it. [8] |
| White material at the roots or inside the pot | Root insects, fungal growth and mineral deposits are all possibilities | Use the root-material guide to look more closely. [6, 34, 37] |
If these clues leave you unsure, ask a plant-health adviser for identification help. For confirmed aphids on leaves or stems, keep the affected plant apart in suitable growing conditions before following the aphid guide. [3, 47]
Some plants naturally look white or woolly
Knowing your plant's normal appearance helps. The old lady cactus, Mammillaria hahniana, naturally has dense white bristles. Dudleya brittonii can have a conspicuous powdery coating of surface wax. Some leaves naturally lack that powdery coating. [9, 10]
Check for insects among natural hairs and wax without damaging the covering. Mealybugs can occur alongside these normal plant features. Avoid rubbing away a coating just to test whether it belongs to the plant. [9, 10]
Once you recognise a mealybug, inspect the plant and gently remove accessible insects. The closer comparisons below are useful when you need its species name, particularly for a species-specific biological control.
What to do when you find mealybugs
Finding one mealybug calls for a careful check of that plant and its neighbours. Inspection will help you judge the extent of the problem. Keep the plant's light, temperature and watering needs in mind as you take these first steps. [3, 18]
- Keep the affected plant apart where possible. Choose a position that meets its growing needs and reduce contact with unaffected foliage. A dark or cold spare room may be unsuitable even when there is more space.
- Remove a few accessible mealybugs gently. Use a method the plant can tolerate. If the plant has already been treated, follow that product’s instructions before touching or cleaning it. After a beneficial release, identify the insect first.
- Inspect the whole plant and its neighbours. Check the hiding places above, then plants that touch it or share supports or materials with it. Base any action on what you find on each plant.
- Keep checking after the initial cleanup. Removing accessible insects may leave hidden ones behind. Let what remains or appears later guide the next step. [2, 3, 18]

When there is little space to separate plants
You may have only one suitable window or cabinet. Keep the plant where its growing needs can be met, reduce leaf contact where practical, and leave enough room to inspect it. Check neighbouring plants and anything that connects them. Suspected root pests also make shared drainage or watering arrangements worth checking. Reducing contact helps, but no particular gap between pots guarantees that insects cannot move; keep inspecting the plants. [3, 18, 34]
Choosing a physical removal method
Check any restrictions on touching or washing a previously treated plant first. For a few accessible mealybugs, support the leaf or stem and gently lift or wipe the insects away. Protect natural hairs and surface wax, and leave any predatory insects undisturbed. [2, 18, 23, 28, 40]
For a larger colony, choose a method that suits the plant. You may be able to prune a heavily infested leaf or shoot with clean tools if the plant can tolerate losing it. Sturdy leaves may withstand a stream of water that dislodges exposed insects; adjust its force to avoid damage. Fragile new growth, tightly packed leaves and delicate surfaces need gentler handling. Aim to reach the insects with as little damage to the plant as possible. [2, 18]
As you work, inspect the pot and supports for insects and egg sacs. Collect affected plant material in a covered container and keep debris or runoff away from other plants. Remove debris from the work area, tools and reused containers, and clean them as needed. Apply a pesticide to those objects only if its directions allow it. When cleaning up after working on a previously treated plant, or cleaning pesticide-contaminated equipment, follow the residue and disposal precautions. [18, 23, 34, 40, 51]
After removing a few accessible mealybugs, keep checking the plant. For numerous or hard-to-reach insects on leaves and stems, compare the treatment choices. Examine white material around the roots before choosing a leaf spray. The insect's feeding habits, development and hiding places help explain why later checks matter.
How mealybugs feed, develop and spread
Feeding damage, honeydew and sooty mould
Mealybugs feed on plant juices through fine, piercing mouthparts. Young insects and adult females feed this way; adult males do not feed. As their numbers grow, feeding can weaken the plant, slow or stunt growth and contribute to early leaf fall. The damage depends on the plant and the size of the infestation. Some plants tolerate small populations without obvious harm. [2, 4]
Feeding also explains the stickiness. Mealybugs excrete excess sugars as honeydew, which can coat leaves and surfaces beneath them. Dark fungi called sooty moulds feed on those sugary deposits and spread across the leaf surface without directly attacking its tissue. A heavy covering can block some of the light needed for photosynthesis, the process by which a leaf uses light to make sugars. Honeydew from other sap-feeding insects and sugary plant secretions can support the same fungal growth. [3, 7]
When you find a sticky or blackened leaf, check the leaves, stems and flowers above it, including any overhanging plant. Tracing the source helps you find the insects producing fresh deposits. A leaf may simply have caught honeydew falling from a colony elsewhere. [7]
Eggs, crawlers and colonies of different ages
Many mealybugs lay eggs in a cottony wax sac. The young insects are nymphs, and their first stage is called a crawler. These tiny insects can move to places where they feed. An indoor colony may contain several ages together: eggs, young insects and larger feeding females. Removing the most obvious adults can leave less visible stages behind. [1, 18]
Longtailed mealybugs usually produce live young and normally lack the conspicuous egg sacs found in many other mealybugs. New young insects can therefore appear in a colony even when you have found no obvious cottony egg mass. [12]

How quickly a generation develops depends on its surroundings and the plant it feeds on. In longtailed mealybugs raised on squash and potato at 20–32 °C, the time taken to develop varied with both the plant and the temperature. Development therefore has no single timetable that fits every houseplant infestation. [19]
Why insects can appear again
A treatment that works on contact can miss a mealybug beneath overlapping plant parts. Insects of different ages can also respond differently: some products affect young, exposed insects more readily than older, waxier stages. The response depends on the species, product and how the insect is exposed. [18, 21, 23]
Killing eggs already present, killing crawlers as they emerge and reducing the eggs a female lays later are different effects. Insect growth regulators affect an insect’s development. In a citrus-mealybug study, the products and doses tested did not consistently reduce the number of eggs females laid. Check which stages a treatment affects: a product that works on young insects cannot be assumed to kill existing eggs or prevent females from laying more. [21, 22]
Seeing insects again does not by itself show that they are resistant to a product or that they are living at the roots. Use the follow-up checks to investigate what has returned. [18, 21, 23]
How an infestation reaches other plants
Mealybugs can arrive with infested plant material, and crawling insects may then reach neighbouring plants. Check where leaves touch and how plants or materials have been handled when deciding which neighbours to inspect. It may still be unclear where an infestation first came from. [3, 18]
The same mealybug species can affect different plant groups in a collection. Citrus and longtailed mealybugs both feed on plants from several families. In Dutch greenhouses, for example, citrus mealybugs have been found on Ficus benjamina and longtailed mealybugs on Phalaenopsis. Include different plant groups when checking neighbours that touch an affected plant or share materials with it. Examine the insects themselves to identify the pest on each plant. [11, 12, 20]
Choosing treatment for leaves and stems
For a few mealybugs you can reach without damaging the plant, gentle removal and later inspection may be manageable. A larger colony, or insects sheltered behind overlapping leaves, changes the problem: a contact spray has to reach the insects, while a predator needs living prey and suitable conditions. Let the location of the insects and the plant’s tolerance guide your choice. White material around the roots needs examining before you choose a leaf treatment. [3, 18, 23, 34]
| Option | When it may help | What to check |
|---|---|---|
| Continued physical removal | A few exposed insects, or colonies you can remove without damaging the plant | Use gentle removal and inspect afterwards for missed or newly visible insects. |
| A product for leaves and stems | Too many insects to remove by hand, where an appropriate product can reach the colony | Check permitted indoor use, plant tolerance and application instructions. A contact spray must reach the insects. |
| A suitable beneficial insect | Living mealybugs are accessible to the predator, and you can provide the conditions it needs | Check the pest, supplied life stage, room conditions and previous treatments before ordering. |
These options can sometimes be used together, but check the combination before doing so, particularly if predators are present or a release is planned. A proposed method also needs to be something you can carry out safely and thoroughly. If the infestation is beyond what you can manage, weigh continued treatment, advice or disposal before adding more treatments. [23, 28, 30]
How insecticidal soaps, oils and neem products work
Insecticidal soaps are made and labelled to control insects. A contact spray needs to touch the insect to work. Spraying an exposed leaf surface will not reach a mealybug hidden behind an overlapping leaf base. [23]
The ingredients matter as well as where the spray lands. A paraffin-oil formulation may act by contact; another oil-based product combines rapeseed oil with the insecticide pyrethrins. Their directions and plant restrictions can differ. Use the exact formulation as directed; cooking oil is not a substitute. [24, 25]
With neem products, read the ingredients as well as the name. Neem oil and formulations containing azadirachtin vary and cannot simply be substituted for one another. Some azadirachtin products affect feeding and moulting—the shedding of the outer covering as a young insect grows. An adult that feeds less may still be alive. The life stages a product affects help explain what you may see after using it; its own instructions determine the application. [26, 48]
Alcohol and household-soap advice
Alcohol can burn leaves. For accessible mealybugs, begin with gentle physical removal that the plant can tolerate, including the precautions for any previous treatment. US horticultural guidance describes alcohol spot treatment, but choosing a household alcohol product for a plant in Germany still requires checking both its suitability and permitted use. Apply the product-use checks to any pesticide you choose. [18, 27]
Household washing-up liquid and strong cleaning soaps can also scorch leaves. Check the ingredients and permitted use of anything sold as “plant soap”; the soap, oil and neem section explains the differences. [7, 23, 27]
Choosing a product you can use at home
Once you know what you need the product to do, check that you can use it on this plant, in this room and in the intended way. For home use in Germany, it must currently be authorised for nonprofessional users, indoor ornamental plants and the identified pest, either by name or within a group that explicitly includes it. Greenhouse directions or a label from another country do not give permission for use in a German living room. Check the exact product name and registration number in the BVL plant-protection product database. A trained retailer can help confirm these details before you buy or apply it. Outside Germany, check your own country’s authorisations. [27, 50, 51]
Before treating a plant whose leaves or fruit you intend to eat, check that the permitted use covers that edible crop. Follow any required waiting period before harvest. Permission to treat ornamental plants alone does not cover food crops. [25, 27]
The plant’s tolerance is part of that choice. Follow all restrictions on the plants and conditions in which the product can be used. If the directions allow a test on a small part of the plant, wait for their full observation period before treating a larger area. A successful test never overrides a plant exclusion. Ask the manufacturer or a plant-health adviser before use if you are unsure whether your plant can withstand it. [23, 24, 25, 27]
Applying the chosen treatment
The directions should tell you how much to use, how to dilute it if required and which parts to cover. Read the interval between applications and the maximum number allowed before you start. For a contact treatment, the aim is to reach the insects at the permitted sites, including leaf undersides or sheltered places where specified. Follow the instructions for runoff and residues. [23, 24, 25, 27]
Keep children and pets away while preparing and applying the product, and follow its instructions about access afterwards. Provide the required ventilation and use the protective equipment it specifies. Avoid skin and eye contact, and keep spray away from food and surfaces you are not treating. Prepare only the amount needed. Mix products only when their directions allow that mixture. If you cannot meet these conditions, choose another suitable method or get advice before applying it. [24, 25, 27, 51]
After application, prevent pets from chewing treated leaves or drinking from saucers. A dry surface or permission to return to a treated area does not establish that residues are safe to swallow or harmless to a predator. Follow the exposure instructions and check previous treatments with the beneficial-insect supplier before a release. [23, 24, 25, 28, 51]
Set any treatment dates from the product’s repeat instructions and inspect between applications. Those checks tell you what remains; they do not authorise a stronger mixture, shorter interval or improvised rotation. Such changes can injure the plant while still missing hidden insects. If new spotting or deterioration follows an application, assess the recent treatment before applying more. [24, 25, 27]
After application: cleanup and storage
Wash your hands after handling the product and follow its equipment-cleaning instructions. Keep leftover spray and water used to rinse pesticide equipment or treated plants out of sinks, toilets, outdoor drains and watercourses. Follow the label and local waste-service instructions for leftovers and contaminated materials. Take unwanted pesticide to a suitable hazardous-waste collection point. Do not apply more simply to use up leftover liquid. [51, 52]
Store the product in its original, labelled packaging, locked away from children and animals and separate from food. Follow the stated storage conditions. [51, 52]
After physical removal or a product treatment, the useful question is whether living mealybugs remain. Later checks help distinguish them from old wax, stickiness or damage, while the chosen method’s instructions govern any further application.
Using beneficial insects against mealybugs
A predator with a woolly larva
Cryptolaemus montrouzieri is a predatory beetle whose larvae and adults eat mealybugs. Its wax-covered, woolly larva can easily be mistaken for a mealybug. Adults are dark brown with a tan-to-orange head and rear end. Fully grown larvae can reach about 13 mm, while young larvae are smaller; size alone cannot identify them. [8]

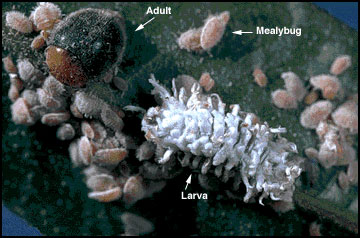
After a release, compare an unfamiliar white insect with the larvae or adults you received before removing or spraying it. Ask the supplier to identify it if the comparison is inconclusive. [8, 29, 30]
Using the Crypto larval kit
The Foliage Factory Crypto kit contains 30 larvae and three release boxes for placing larvae near living mealybug colonies on leaves and stems. The temperature, release and holding instructions here concern that kit. For suspected root pests, examine the roots first. [29, 30]
Before ordering the larvae
Before ordering, make sure there are living mealybugs for the larvae to eat. Insect Heroes says its Crypto larvae prefer temperatures above 16 °C and are most active and effective at 21–28 °C. Choose a position that also meets the plant’s growing needs. [30]
Previous treatments can rule out an immediate release even when the plant’s position is suitable. Tell the supplier everything used on the plant, including products applied to its growing medium: the exact product and formulation, how and when it was applied, the concentration if known, and any repeated or combined treatments. Ask whether residues could still harm the larvae after drying. For a newly purchased plant, ask the seller about earlier treatments. If its history is unknown, obtain the supplier’s advice before ordering or releasing larvae. [28, 33]
The supplier can use information such as the Biobest side-effects database to assess that history. Many of its residue-persistence estimates concern a single application in north-western European greenhouses. Repeated or combined applications may leave harmful residues for longer, and conditions in a home may differ. A missing entry means the effect is unknown; products described as “natural” need the same check. [28]
While you wait for advice about previous treatments, you may be able to gently remove accessible mealybugs. Leave fragile plant parts undamaged and follow the earlier product’s restrictions on touching or washing the plant. Protect any beneficial insects already present. [27, 28, 51]
With living prey, suitable growing conditions and any uncertainty about earlier treatments resolved, you can decide whether to order the Foliage Factory Crypto kit. Read the Insect Heroes pack instructions and follow the directions supplied with the pack you receive. If larvae have already arrived, use the holding and release guidance below. [29, 30]
The short delay in Insect Heroes’ cleaning advice does not establish a waiting period after a pesticide. Ask the supplier whether residues from the exact product used could still harm these larvae. Its grouping advice also needs care: keep unaffected plants out of contact with colonies. [3, 28, 30]
Releasing the larvae and checking afterwards
Once you have checked that the larvae can be used on your plant, release them promptly after receipt. Place the boxes close to colonies on affected plants, out of direct sunlight. Distribute the supplied larvae as the pack directs. Keep unaffected plants apart. [3, 29, 30]
During later checks, look for living mealybugs while recognising and protecting the larvae you released. Follow the pack’s instructions for checks and further releases, and ask the supplier about persistent colonies. Any later spray needs a fresh compatibility check. Assess what remains on the plant before changing methods: a deposit or a predator can otherwise be mistaken for a continuing pest. [28, 29, 30]
The kit has arrived, but you cannot release it yet
Before opening the pack for release, make sure there are living mealybugs for the larvae to eat and that the growing conditions suit both plant and larvae. Check the maker and directions on the pack, and whether residues from earlier treatments could harm the larvae. Contact the supplier promptly if there is no prey, the growing conditions are wrong or you are unsure about previous treatments. [28, 30]
For its Crypto larvae, Insect Heroes specifies short storage at 10–15 °C, in darkness, for no more than one or two days after receipt. Maintain both the temperature and darkness throughout that period. For a different supplier's pack, follow that supplier's storage instructions. [30]
Any waiting period after a pesticide treatment must be checked separately with the supplier. Contact the supplier immediately if you cannot provide the stated temperature and darkness, delivery was badly delayed, or you still lack advice about the earlier treatment as the holding limit approaches. Do not release the larvae onto an unsuitable plant to avoid storing them. Once there is prey, the conditions suit plant and larvae, and you have checked that earlier treatments are compatible with the larvae, release promptly. [28, 29, 30]
Root mealybugs: signs, lookalikes and next steps
When to investigate the roots
White material inside a pot can be insects, fungal threads or mineral deposits. The root ball is the mass of roots and the potting mix held around them; material on its outside deserves a closer look. Persistent, unexplained decline can also justify investigating below ground. The purpose of that inspection is to find the cause before deciding whether the roots need treatment or disturbance. [6, 34, 37]
Root-feeding insects can affect the whole plant. In severe infestations of Ripersiella hibisci, young insects and adult females feeding on roots can interfere with water and nutrient uptake. Slow growth, wilting and deteriorating leaves can also come from unsuitable conditions or root disease. Check watering, where the plant is kept and any recent treatment alongside what is visible at the roots. Clean-looking foliage can conceal a root colony; a failed leaf treatment alone does not establish one. [6, 34, 40]

Before inspecting a suspect root ball, check whether any earlier treatment restricts touching the plant or its growing medium. If handling is safe and the plant can withstand being taken out of the pot, support it and gently ease the root ball free. Look at the outside where roots meet the pot wall. Stop and ask for advice if it will not come free without damage; photographs of what is visible can help. Leave the growing medium around the roots and avoid repeatedly unpotting the plant. [27, 34, 40, 51]
Look for whole insects among the wax. Some root-mealybug females have a fine white or bluish coating and lack the long edge filaments of familiar aboveground species. A white patch, or an insect that stays still during a brief look, is not enough to identify it. [35, 36]


Compare the insects and their surroundings; white material alone is still not a diagnosis.
Compare the material before deciding on treatment
| What you find | What it may mean | What to do next |
|---|---|---|
| Wax around whole, mealybug-like insects | A root-mealybug infestation is possible | For confirmed root mealybugs, follow the root-mealybug response. Get identification help if you remain unsure. [34, 35, 40] |
| A wax-covered colony of root aphids | Some root aphids produce conspicuous white wax | Keep the affected plant apart in suitable conditions and obtain advice for that root pest on your particular plant. [36, 49] |
| Branching threads or a dense, fluffy white mass | Fungal mycelium may be present | If the growth is confirmed as fungi feeding on dead material and the plant is healthy, keep an eye on it. Get further advice if you cannot identify it or the plant is declining. [37, 38] |
| White crystalline deposits on the pot or growing medium | Accumulated salts are one possibility | Check how much fertiliser you have used, how wet the growing medium is and whether the pot drains as intended. For a reservoir system, follow its own instructions. If the plant is declining or there is another reason to examine its roots, follow the safe root-inspection guidance. [6] |
Root aphids. The rice root aphid, Rhopalosiphum rufiabdominale, can form wax-covered colonies and weaken plants. Undisturbed aphids may stay still. Examine the insect closely: the paired tubes used to recognise many leaf-feeding aphids are not reliable for every root aphid. Keep a plant with identified root aphids apart in suitable conditions and get advice for that pest on that plant. [36, 49]
Fungal growth. Mycelium is a network of fungal threads. Fungi that feed on dead organic material are called saprotrophic fungi. They can grow in potting mix or on its container even when the plant is healthy. If the fungus has been identified as a saprotroph and the plant is healthy, you may only need to keep an eye on both. Get advice if the threads remain unidentified or the plant is declining. White threads alone cannot tell you which fungus is present or whether it is harmless. [37, 38]
Salts and water. Excess fertiliser salts can damage roots and cause decline that resembles root rot. Roots can also deteriorate in persistently waterlogged potting mix. Because these problems can look similar, check the growing conditions as carefully as the white material. [6]
Review what you have fed the plant and how water moves through its pot. If a pot designed to drain freely is accidentally standing in collected water, remove that water and check why the growing medium stays saturated. A purpose-built self-watering or hydroponic reservoir is meant to hold water; check it according to that system's design. Crystals alone do not reveal the salt level. They are not, by themselves, a reason to flush the pot, stop feeding for a set period or repot. [6]
Getting help when the cause is unclear
If you cannot identify the insect or explain the decline, ask a plant-health adviser or diagnostic service to help resolve that question before choosing treatment. Describe the plant, where the material appears, its growing conditions and previous treatments. Ask which photographs or samples are needed before sending anything. That information helps the adviser assess insects and growing conditions together. [34, 39]
In Germany, start with the Julius Kühn Institute directory of state plant-protection contacts. Ask whether the service advises private houseplant owners or can refer you elsewhere. Services, sample requirements and charges vary. Ask the beneficial-insect supplier about its product's compatibility and handling. [28, 39]
Managing confirmed root mealybugs
Keep a plant with confirmed root mealybugs apart in suitable growing conditions. Check whether it shares drainage with other plants or whether contaminated pots, growing medium or debris have been moved between them. In container production, Ripersiella hibisci has spread through drainage holes and irrigation water. Inspect the plants that share these materials or water, and base treatment on the insects found on each one. [34]
In nurseries, crawlers have been found on benches, pots, tools, workers’ hands and clothing after contact with infested plants. Before moving to another plant, check your hands and clothing for insects or bits of potting mix, clean contaminated equipment, and keep removed medium and drainage water away from other plants. [40]
For a plant you intend to keep, settle what to do about remaining insects before removing growing medium. That may mean finding a permitted root treatment or deciding whether gentle washing and later inspection suit this plant. If you do not know which option suits the plant or whether its roots can withstand it, get advice before disturbing them further. For a severe confirmed infestation beyond what you can reasonably treat, consider whether to keep the plant. [34, 40, 41]
If you intend to use a pesticide around the roots, check that its instructions permit this pest, indoor use on the plant and application to the growing medium. Follow the complete product-use and safety checks. Directions for spraying leaves do not permit pouring the product into the pot as a drench. [27]
Washing can carry away some mealybugs with the growing medium, while insects can remain on the roots. It is an optional way to reduce a confirmed infestation where the plant can withstand root disturbance. Before washing a previously treated plant, check that the product’s instructions allow handling and washing. [27, 34, 40, 41, 51]
If you do wash the roots, collect loosened medium and water away from other plants. Follow the residue and disposal precautions where pesticides have been used. If repotting is needed, use fresh, appropriate growing medium and a cleaned container. [27, 34, 40, 41, 51]
Inspection afterwards is part of keeping the plant, including after washing or repotting. Follow the chosen method and check for continuing activity without unnecessary root disturbance. [34, 40, 41]
What to check after treatment
Later checks answer two questions: are mealybugs still present, and how is the plant coping? Living insects, an old deposit and a new mark on a leaf can call for different responses. Looking closely before treating again helps you tell them apart. [6, 18, 24]
Return to the original infestation sites, other hiding places and new growth. Include previously affected plants and neighbours that touch them or share materials. A weekly reminder can help organise these visual checks. Application dates follow the product or kit instructions; the reminder is not a schedule for spraying or unpotting. [2, 3, 18]
If root mealybugs have been confirmed on the plant, use the root-inspection guidance to decide whether the roots need another look. Inspect only when there is a reason to do so and the plant can tolerate the disturbance. [34, 40]
A brief record makes the next check easier to interpret. Note the date and places examined, and whether you saw living mealybugs, possible egg sacs or other deposits. Record what you did, including any treatment.
| What you see | What to do next |
|---|---|
| Identified living mealybugs persist or return | Review why the insects remain. Follow the method's limits and protect any beneficial insects already being used when deciding whether to continue or change it. |
| Wax, stickiness or sooty mould remains | Examine the deposits for insects, egg sacs or a fresh source. Clean only if the plant can tolerate it, and follow the cleaning restrictions for the method you are using. |
| A suspected egg sac remains, but no insects are moving | Follow the egg-sac guidance. A known empty remnant needs a different response from material that may still contain eggs. |
| The plant declines or develops new marks after treatment | Check recent applications and growing conditions. Inspect the roots when there is a reason to do so, and get advice if the cause remains unclear. |
| Repeated checks find no living pests | Check for material that might still contain eggs and review any further steps the method requires before returning the plant to its usual place. |
These observations can overlap. A new colony may sit beside old deposits, and a plant can have both living pests and treatment injury. Follow the explanation for each thing you find before deciding whether another treatment is needed. [6, 18, 24, 28]
Living insects and persistent deposits
When living mealybugs remain, ask whether the method reached the colony, whether its instructions were followed and whether another plant or material could be reintroducing insects. With a contact product, spraying the same exposed surfaces can leave a sheltered colony untouched. For leaves and stems, reconsider the treatment choices; confirmed root mealybugs need the root response. [18, 23]
Gently remove accessible pests only if the plant can withstand it. Follow the earlier product’s restrictions on touching or cleaning the plant and protect beneficial insects already present. [18, 23, 27, 28]
Wait as directed between sprays, do not exceed the allowed number of applications, and check that further sprays can be used with any beneficial insects. Do not increase the concentration because more insects have appeared. When the permitted course is complete and pests remain, ask for advice on the next option before adding more applications. [23, 27, 28]
Sooty mould can remain after the insects that produced the honeydew have disappeared. Wax from the root mealybug Geococcus coffeae can also persist after the infestation has been controlled. Deposits alone cannot tell you whether living pests remain. [7, 41]
Gentle wiping with water may remove some sooty deposits and make insects easier to see, provided the leaf can tolerate it. Protect delicate surfaces, follow instructions about treatment residues and leave beneficial insects undisturbed. Fresh stickiness gives you a different clue: look at the leaves, stems and flowers above it, including any overhanging plant, for the source. Cleaning what has fallen onto a leaf cannot stop insects elsewhere producing more honeydew. [7, 23, 28]
A suspected egg sac remains, but no insects are moving
An empty egg sac can remain after the insects have gone. A sac that may still contain eggs needs a closer look: eggs can be alive without visible movement, and white material may have another cause altogether. Keep watching and ask for identification help if you are unsure what it is. [1, 18]
Once you recognise a mealybug egg sac, you may gently remove it if you can reach it without damaging the plant. First check the earlier product’s instructions for touching or cleaning the plant, and leave any beneficial insects undisturbed. Follow the gentle-removal instructions. [21, 22, 23, 28]
Keep the plant apart while a sac may still contain eggs. After it has been removed or identified as empty, check when the plant can return to its usual place. The sight of a possible sac does not automatically call for another spray; any repeat treatment must affect the relevant life stage and stay within its instructions. [21, 22, 23, 28]
New marks or decline after an application
New damage calls for a review of both the treatment and the plant’s conditions before another application. Record the exact product or household remedy, its ingredients and concentration if known, and the dates of all applications. Compare its plant restrictions with the light, temperature and other conditions during and after use. [18, 24]
Treatment injury is one possibility. For example, the paraffin-oil product Promanal Neu warns about damage from strong sunlight after use. Pause further applications of a suspect product while checking whether it is suitable for the plant and what caused the marks. Note when the marks appeared, and check for pests or other possible causes. [18, 24]
Check the light and watering, whether the potting mix stays waterlogged, and whether fertiliser salts may have built up. Use the root-inspection guidance when there is a reason to look below the surface. Living pests and treatment injury can occur together; a product adviser or plant-health service can help before further treatment or root disturbance. [6, 24, 39]
Provide the light and watering your plant needs, adjusting them if you have found a problem such as persistent waterlogging. Avoid extra feeding to try to speed up recovery. New damage alone is not a reason to rinse, prune, repot or stop feeding for a set number of days. Recovery time depends on the plant and the type of injury. [6, 18, 24]
Continue treatment, get advice or remove a severely infested plant
Whether you keep treating the plant depends on its condition, the work you can manage and the risk to the rest of your collection. If you are unsure which insect is present, which treatment to choose or whether the plant can withstand it, ask a plant-health adviser; the product supplier can help with questions about using its treatment. If a severe infestation on leaves and stems or a confirmed severe root infestation is too difficult to treat, discarding the plant is an option. [2, 34, 40]
Once you have decided to discard the plant, put it and loose infested material in a bag or covered container before carrying them past other plants. Follow local waste-service instructions, including requirements for pesticide-treated material, and clean contaminated containers or work areas before reuse. Do not reuse infested growing medium or give an infested plant to another grower. For confirmed root mealybugs, also follow the root-handling precautions. Check neighbouring plants individually. One insect, old residue or unidentified white material is not, on its own, a reason to discard a plant or its neighbours. [18, 34, 40, 52]
Returning the plant to its usual place
You can consider returning the plant when repeated checks find no living mealybugs, any suspected egg sacs have been removed or identified as empty, and the treatment or beneficial-insect instructions allow the move. Recheck the original infestation sites, other hiding places and new growth. Also inspect plants that touch it or have shared materials with it. Known empty sacs and old deposits alone do not require continued separation. [1, 18, 28]
After a root infestation, you also need to know whether insects remain at the previously affected root sites. Check those roots safely, or get diagnostic advice if the plant cannot withstand inspection. Clean-looking leaves cannot tell you whether the insects below have gone. [34, 40]
Keep the plant in suitable growing conditions throughout and weigh the remaining risk to nearby plants before moving it. No fixed number of clear checks or days guarantees that every insect has been found. Once it is back, keep checking it so you can respond promptly if mealybugs reappear. [3, 18]
Reducing the risk of another infestation
Inspect new arrivals before placing them in the collection
Inspect new plants before placing them among the others, including the hiding places described above. Keep them apart for observation where possible, in suitable growing conditions, and repeat the checks. Even after a clear first inspection, small insects or sheltered colonies may have been missed. [3, 18]
Suspicious material at the roots, unexplained decline or another clear reason to suspect root pests can justify checking the outside of the root ball. Stop if it will not come free without damage. This is a check for a specific concern; it does not require stripping, washing or repeatedly exposing every new plant's roots. [34, 40]
Make inspection part of ordinary plant care
When watering, turning or tending a plant, look at places that are easy to overlook. Reduce leaf contact where practical and respond to what you find on each plant. With limited space, use the first-response advice to keep growing conditions suitable while reducing contact between plants. [3, 18]
Collect affected debris and clean contaminated containers before reuse. With root pests, also check shared drainage and whether infested growing medium has been moved between plants. Old potting mix is not necessarily infested. Check whether it has been in contact with infested material. [34, 40]
Keep watering and feeding appropriate to the plant and its growth. Excess fertiliser, particularly when growth is slow, can create additional problems, including salt-related root injury. [6]
Follow an ant trail to the plants it reaches
Ants collect honeydew and may protect the insects supplying it. In one experiment on hibiscus, fire ants (Solenopsis invicta) visited colonies of cotton mealybugs (Phenacoccus solenopsis). Colonies were larger on plants the ants could reach than on plants kept free of ants. Fewer mealybugs on the ant-visited plants served as hosts for the wasps’ young. An ant trail can help you find a colony, although mealybugs can also occur without ants. [45]
When you see an ant trail, inspect the plants it reaches and look for sugary deposits and their source. For persistent indoor ant activity, seek help identifying the ants and deciding what to do about them. [45, 46]
Look closely at that first white tuft and the plant around it. During later checks, watch for living insects, possible egg sacs and fresh stickiness. Keep the plant in the light and temperatures it needs while it is apart from the collection, and continue those checks after it returns.
Sources and further reading
The references below provide the identification, biology and practical information used in this guide. Product and supplier instructions describe particular formulations or living-insect products; follow the current instructions for the product you are actually using.
- 1. USDA identification resource. Pseudococcidae: mealybugs. Scale Insects, edition 2.
- 2. Royal Horticultural Society. Mealybug.
- 3. Royal Horticultural Society. Indoor plants: sap feeders.
- 4. USDA identification resource. What are scale insects?. Scale Insects, edition 2.
- 5. Royal Horticultural Society. Scale insects.
- 6. Connecticut Agricultural Experiment Station. Houseplants. Plant Pest Handbook. Houseplant diagnosis and problems caused by growing conditions.
- 7. Royal Horticultural Society. Sooty moulds.
- 8. Cornell University. Cryptolaemus montrouzieri. Biological Control: A Guide to Natural Enemies in North America.
- 9. Royal Horticultural Society. Mammillaria hahniana.
- 10. Mulroy, T. W. (1979). Spectral properties of heavily glaucous and non-glaucous leaves of a succulent rosette-plant. Oecologia 38:349–357.
- 11. USDA identification resource. Planococcus citri. Scale Insects, edition 2.
- 12. USDA identification resource. Pseudococcus longispinus. Scale Insects, edition 2.
- 13. USDA identification resource. Pseudococcus viburni. Scale Insects, edition 2.
- 14. USDA identification resource. Phenacoccus madeirensis. Scale Insects, edition 2.
- 15. Watson, G. W., Williams, D. J., von Ellenrieder, N. & Kinnee, S. A. (2017). Evidence for a cryptic species-group around Phenacoccus madeirensis Green, 1923 (Hemiptera: Pseudococcidae). Pan-Pacific Entomologist 93(3):115–126. Abstract on the publisher’s website.
- 16. USDA identification resource. Ferrisia malvastra. Scale Insects, edition 2.
- 17. Rung, A., Scheffer, S. J., Evans, G. A. & Miller, D. R. (2008). Molecular identification of two closely related species of mealybugs of the genus Planococcus (Homoptera: Pseudococcidae). Annals of the Entomological Society of America 101(3):525–532.
- 18. University of California Statewide Integrated Pest Management Program. Mealybugs. Pest Notes Publication 74174. Practical inspection and management guidance.
- 19. Gillani, W., Copland, M. & Raja, S. (2011). Effect of Different Temperatures and Host Plants on the Biology of Long-Tailed Mealy Bug, Pseudococcus longispinus Targioni and Tozzetti (Homoptera: Pseudococcidae). Pakistan Journal of Scientific and Industrial Research, Series B 54(3):142–151.
- 20. Jansen, M. G. M. & Alferink, L. P. (2023). An updated list of scale insects (Hemiptera, Coccomorpha) from import interceptions and greenhouses in the Netherlands (PDF). Journal of Insect Biodiversity 44(2):21–40. DOI record.
- 21. Espinoza-Lozano, L., Guerrero, S., Osborne, L. S., Leppla, N. C., Hodges, A. C. & Giurcanu, M. C. (2018). Alternatives to a pyrethroid for controlling Madeira mealybug (Hemiptera: Pseudococcidae) on coleus cuttings. Florida Entomologist 101(3):389–394.
- 22. Cloyd, R. A. (2003). Effect of Insect Growth Regulators on Citrus Mealybug [Planococcus citri (Homoptera: Pseudococcidae)] Egg Production. HortScience 38(7):1397–1399.
- 23. Dow AgroSciences / US Environmental Protection Agency (2005). M-Pede Insecticide/Fungicide, EPA registration 62719-515 (PDF). Label accepted 19 December 2005. Historical US label describing contact action and plant sensitivity for this formulation. For use in Germany, check current German authorisation separately.
- 24. Neudorff. Promanal Neu Schild- und Wolllausfrei. Product information and application precautions.
- 25. Neudorff. Spruzit Schädlingsfrei. Product ingredients and application information.
- 26. OHP / Certis USA (2014). Azatin O Biological Insecticide specimen label (PDF). EPA registration 70051-9-59807; revision 23 April 2014. Historical US formulation and mode-of-action information.
- 27. Federal Republic of Germany. Pflanzenschutzgesetz, § 12: Anwendung von Pflanzenschutzmitteln. Current statutory requirements for use.
- 28. Biobest. Side Effects Data. Compatibility information and guidance on interpreting missing data and residual effects.
- 29. Foliage Factory. Cryptolaemus montrouzieri against mealybugs. Kit contents and product information.
- 30. Insect Heroes. Crypto gegen Wollläuse. Supplied larvae, operating conditions, placement and short-storage instructions.
- 31. Cornell University. Parasitoids. Biological Control: A Guide to Natural Enemies in North America.
- 32. Chong, J.-H. & Oetting, R. D. (2007). Specificity of Anagyrus sp. nov. nr. sinope and Leptomastix dactylopii for six mealybug species. BioControl 52:289–308.
- 33. Calvo-Agudo, M., González-Cabrera, J., Picó, Y., Calatayud-Vernich, P., Urbaneja, A., Dicke, M. & Tena, A. (2019). Neonicotinoids in excretion product of phloem-feeding insects kill beneficial insects. Proceedings of the National Academy of Sciences 116(34):16817–16822.
- 34. EFSA Panel on Plant Health (2020). Pest categorisation of Ripersiella hibisci. EFSA Journal 18(6):6178. Biology, detection and spread assessment.
- 35. USDA identification resource. Rhizoecidae. Scale Insects, edition 2.
- 36. Gill, S. & Kunkel, B. (2021). Nursery Management of Two Major Below-Ground Feeding Plant Pests: Root Mealybug, Rhizoecus sp. and Rice Root Aphid, Rhopalosiphum rufiabdominalis (Sasaki) (Hemiptera: Pseudococcidae and Aphididae). Journal of Environmental Horticulture 39(4):131–137.
- 37. Royal Horticultural Society. Fungi in annoying places.
- 38. Royal Horticultural Society. Saprotrophic fungi.
- 39. Julius Kühn Institute. Ansprechpartner der Pflanzenschutzdienste. German state plant-protection contact directory.
- 40. University of California Statewide Integrated Pest Management Program. Ground (Root) Mealybugs. Floriculture and Ornamental Nurseries Pest Management Guidelines. Nursery detection and hygiene context.
- 41. Hara, A. H., Niino-DuPonte, R. Y. & Jacobsen, C. M. (2001). Root Mealybugs of Quarantine Significance in Hawaii (PDF). University of Hawaii CTAHR, Insect Pests IP-6. Practical root handling and wax deposits that can remain after control.
- 42. Cabral, S. K. & Hara, A. H. (2015). Efficacy of Insecticides Against Root Mealybugs in Pisonia brunoniana, 2012. Arthropod Management Tests 40(1):G3. Publisher full text.
- 43. European and Mediterranean Plant Protection Organization. Ripersiella hibisci (RHIOHI). EPPO Global Database: identity and taxonomy.
- 44. Caballero, A., Kaydan, M. B., Ramos-Portilla, A. & Raupach, M. J. (2026). Integrative taxonomy reveals a hidden diversity: Redescriptions and new records of Rhizoecidae (Sternorrhyncha: Coccomorpha) in Germany. European Journal of Entomology 123:90–121. Publisher page.
- 45. Zhou, A., Lu, Y., Zeng, L., Xu, Y. & Liang, G. (2012). Does Mutualism Drive the Invasion of Two Alien Species? The Case of Solenopsis invicta and Phenacoccus solenopsis. PLOS ONE 7(7):e41856.
- 46. Umweltbundesamt. Ameisen. Indoor ant identification and management information.
- 47. Royal Horticultural Society. Aphids.
- 48. US Environmental Protection Agency (1995). Neem Oil; Tolerance Exemptions. Federal Register 60(239):63950–63953. Historical US assessment of neem-derived ingredients. Check current local product authorisation separately before use.
- 49. European and Mediterranean Plant Protection Organization. Rhopalosiphum rufiabdominale (RHOPRU). EPPO Global Database: preferred name and other scientific names.
- 50. Federal Office of Consumer Protection and Food Safety (BVL). Verzeichnis zugelassener Pflanzenschutzmittel. Official German product and permitted-use database.
- 51. German Federal Institute for Risk Assessment (BfR) (2019). Pflanzenschutzmittel in Haus- und Kleingärten sicher anwenden (PDF). Communication 026/2019, 24 July 2019. Household handling, protection from exposure, storage and keeping contaminated wash water out of drains.
- 52. German Environment Agency (Umweltbundesamt) (2026). Pflanzenschutzmittel möglichst selten und umweltschonend einsetzen. Updated 26 February 2026. Storage and disposal guidance.


Leave a comment